
Are you ready to add a delightful twist to your dinner routine? In this post, we will explore an irresistible Country Fried Chicken Breast recipe that is not only easy to prepare but also promises to be a crowd-pleaser. Perfect for busy weeknights or fancy family gatherings, this dish will give your meal a comforting yet mouthwatering essence. With our easy-to-follow instructions and tips, you’ll be serving up plates of crispy perfection in no time. Let’s dig in!
Table of Contents
Why You’ll Love This Recipe
When it comes to comfort food, few dishes rival the satisfaction of Country Fried Chicken Breast. This recipe is juicy, golden-brown, and bursting with flavor, making it a favorite for both kids and adults alike. The appeal lies not only in its irresistible taste, but also in its incredible convenience. Whether you’re a novice cook seeking an easy weeknight option or an experienced chef looking for a time-saving dish, this recipe has you covered. Plus, its affordability and straightforward ingredients mean you can whip it up without breaking the bank.
Ingredients
To prepare this mouthwatering Country Fried Chicken Breast, you’ll need a handful of simple ingredients. Here’s what you’ll need to make this classic dish shine:
- Chicken Breasts: Boneless and skinless; they provide a tender and juicy base.
- Flour: All-purpose flour is essential for that perfect crunchy coating.
- Cornstarch: Helps to create an ultra-crispy texture that expands flavor.
- Baking Powder: Adds a lightness to the batter.
- Salt and Pepper: Essential for flavor enhancement; adjust to your taste.
- Garlic Powder and Onion Powder: Adds depth and spices up the dish.
- Buttermilk: Creates a tenderizing marinade; you can substitute with milk and vinegar if needed.
- Vegetable Oil: For frying; choose a high smoke point oil like canola or peanut oil.
What You’ll Need to Make Country Fried Chicken Breast
Gather these ingredients for a quick start to your culinary adventure!
Equipment
To successfully cook your Country Fried Chicken Breast, you’ll need some essential kitchen tools. Here’s a list for your convenience:
- Large Bowl: For marinating the chicken in buttermilk.
- Mixing Bowl: To combine the dry ingredients.
- Whisk: For blending the flour, cornstarch, and spices.
- Deep Fryer or Cast Iron Skillet: Ideal for achieving a perfect, crispy fry.
- Tongs: For safely flipping your chicken during frying.
- Wire Rack: To drain excess oil after frying, helping maintain crispiness.
Recommended Tools
These tools will make the process smoother and are excellent investments for any home chef.
Step-by-Step Process
Getting your Country Fried Chicken Breast ready is easy with the following straightforward steps:
1. Marinate the Chicken:
- Place the chicken breasts in a large bowl and cover them with buttermilk. Let them marinate for at least 1 hour (or overnight in the fridge) to achieve maximum tenderness.
2. Prepare the Coating:
- In a mixing bowl, combine flour, cornstarch, baking powder, salt, pepper, garlic powder, and onion powder. This will be your seasoned coating.
3. Heat the Oil:
- In a deep fryer or skillet, heat vegetable oil to 350°F (175°C). Ensure there’s enough oil to fully submerge the chicken for even frying.
4. Dredge the Chicken:
- Remove each chicken breast from the buttermilk, shaking off excess liquid. Dredge in the flour mixture, pressing firmly to ensure the coating sticks.
5. Fry the Chicken:
- Carefully place each coated chicken breast in the hot oil. Fry for about 5-7 minutes per side or until golden brown and cooked through (internal temperature should reach 165°F or 74°C).
6. Drain and Serve:
- Once cooked, remove the chicken and place it on a wire rack to drain excess oil. Let it rest for a few minutes before serving.
Pro Tips & Troubleshooting
Achieving Crispy Chicken: For an extra crunch, double-dredge your chicken by dipping it again in the buttermilk and re-coating with the flour mixture before frying.
Avoiding Oil Splatter: Gently lower the chicken into the oil and avoid overcrowding the pan, which can reduce the oil temperature and lead to soggy chicken.
Common Mistakes: Ensure your oil is at the correct temperature before frying as overly hot oil can burn the coating, while too-cool oil will make the chicken greasy.
Serving Suggestions
Make your meal truly special with these delicious serving ideas:
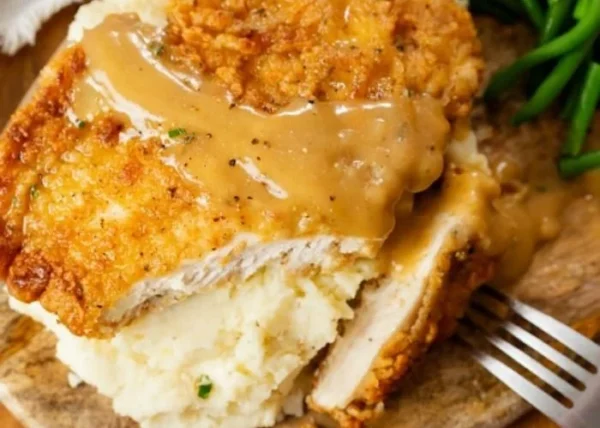
Classic Pairings: Serve with homemade gravy, mashed potatoes, and collard greens for a true Southern feast.
Creative Variations: Turn your fried chicken into a sandwich by adding lettuce, tomato, and your favorite sauce on a toasted bun.
Garnishes: A sprinkle of chopped parsley or fresh herbs can add a splash of color and flavor.
Best Ways to Use Leftover Chicken
Transform leftover chicken into salads, wraps, or even a savory chicken and waffles dish for a fun breakfast twist!
Storage
After enjoying your crispy delights, here are some storage tips to keep in mind:
- Leftovers: Store in an airtight container in the refrigerator for up to 3-4 days.
- Freezing: If you want to keep your fried chicken longer, it can be frozen for up to 3 months. Be sure to use freezer-safe bags to avoid freezer burn.
FAQ Style Snippet
- How long can I store fried chicken in the fridge?
Leftover fried chicken can be stored in the refrigerator for 3-4 days.
Nutrition
While Country Fried Chicken Breast is a delectable treat, it also carries nutritional value. Here are some key takeaways:
Protein Power: Chicken breast is a great low-fat protein source, which is essential for muscle repair and growth.
Caloric Consideration: A standard serving can range from 300 to 500 calories depending on the cooking method and portion size.
Health Benefits: Besides protein, chicken contains essential vitamins and minerals like B vitamins and iron, making it a valuable part of a balanced diet.
FAQs
Can I use chicken thighs instead of breasts?
Yes! Chicken thighs will give a richer flavor and slightly different texture. Just adjust cooking times as they may take longer.
What can I substitute for buttermilk?
You can make a quick substitute by mixing 1 cup of milk with 1 tablespoon of vinegar or lemon juice, letting it sit for 5-10 minutes.
Can I bake instead of frying?
Absolutely! For a healthier version, you can bake the coated chicken at 400°F (200°C) for about 20-25 minutes until fully cooked, turning halfway through.u003cbru003e
How do I know when the chicken is done?u003cbru003e
The safest way is to check the internal temperature with a meat thermometer; it should reach 165°F (74°C).u003cbru003e
Can I marinate for too long?
While marinating is beneficial, over-marination (more than 24 hours) can lead to mushy chicken due to the acidity
Conclusion
Cooking a delicious Country Fried Chicken Breast at home is a rewarding experience that guarantees satisfaction at the dinner table. With a well-crafted preparation process and expert tips at your fingertips, you can create a dish your family will absolutely love. So gather your ingredients, fire up that skillet, and embark on this culinary journey! Don’t forget to try variations and creative pairings for a truly unforgettable meal. If you enjoyed this recipe, explore more of our delicious offerings to elevate your cooking skills. Happy frying!

Country Fried Chicken Breast
Ingredients
Method
- Place the chicken breasts in a large bowl and cover them with buttermilk. Let them marinate for at least 1 hour or overnight for maximum tenderness.
- In a mixing bowl, combine flour, cornstarch, baking powder, salt, pepper, garlic powder, and onion powder to create the seasoned coating.
- Heat vegetable oil in a deep fryer or skillet to 350°F (175°C). Ensure there's enough oil to fully submerge the chicken.
- Remove each chicken breast from the buttermilk, shaking off excess liquid. Dredge in the flour mixture, pressing firmly to ensure the coating sticks.
- Carefully place each coated chicken breast in the hot oil. Fry for about 5-7 minutes per side or until golden brown and cooked through (internal temperature should reach 165°F or 74°C).
- Once cooked, remove the chicken and place it on a wire rack to drain excess oil. Let it rest for a few minutes before serving.