
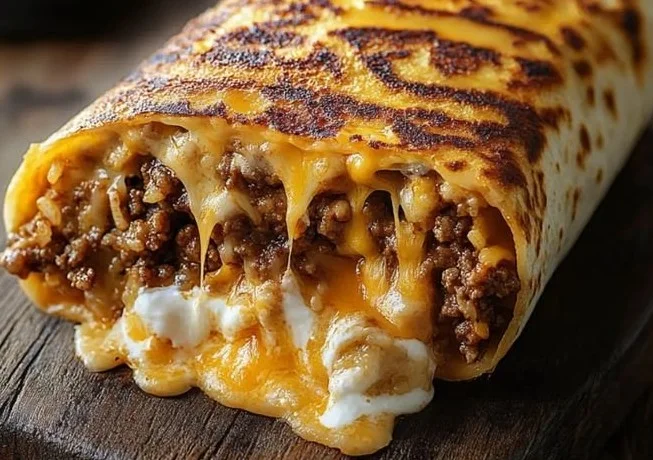
Grilled Cheese Burrito is a mouthwatering fusion dish that wraps gooey melted cheese, seasoned protein, and flavorful fillings in a crispy, golden-brown toasted tortilla for the ultimate handheld comfort meal.
If you love comfort food with a fun twist, this Grilled Cheese Burrito recipe is for you. In under 20 minutes you’ll get gooey cheese, a crisp tortilla exterior, and a satisfying mix of fillings that make weeknight dinners exciting again.
This post is written for home cooks – beginners and busy families – who want an affordable, time-saving recipe with big flavor. Keep reading to learn step-by-step instructions, smart tips, and serving ideas to master the Grilled Cheese Burrito at home. For inspiration on fast handheld recipes, check out this easy appetizer idea,
What you’ll walk away with is a repeatable method that delivers consistent melt and crunch every time – perfect for weeknights, lunchboxes, or a fun party snack.
Table of Contents
What Makes This Recipe So Special
This Grilled Cheese Burrito blends two beloved comfort foods into one portable, craveable package. It’s simple enough for beginners and flexible for creative cooks – use leftover chicken, taco meat, or beans for a vegetarian option. Emotional win: it hits nostalgia with buttery, toasted tortilla edges and stretchy cheese. Practical win: it’s affordable and quick, making it ideal for busy schedules and small budgets. Keywords to keep in mind: easy, time-saving, affordable, beginner-friendly.

Grilled Cheese Burrito
Ingredients
Method
- Heat shredded protein and rice with a spoonful of salsa or taco seasoning. Keep fillings moist but not watery to prevent the tortilla from getting soggy.
- Lay a warm tortilla flat. Sprinkle a thin layer of cheese in the center (about ½ cup). Add protein, a spoonful of rice (if using), and another sprinkle of cheese on top.
- Fold the bottom edge up over the filling, tuck the sides in, and roll tightly to form a cylinder. Press the final edge to seal; the melted cheese will help hold it together.
- Heat 1 tbsp butter or oil in a skillet over medium heat. Place seam-side down to seal. Cook 2–3 minutes per side, pressing gently with a spatula, until the outside is golden brown and cheese inside is melted.
- Turn until all sides are crisp.
Notes
What You’ll Need to Make a Grilled Cheese Burrito
- Large flour tortillas (10-12 inch) – sturdy for folding; don’t use fragile taco shells.
- Shredded cheese blend (2 cups) – cheddar + Monterey Jack for stretch and flavor.
- Cooked protein (1-1½ cups) – shredded chicken, ground beef, or black beans; seasoned to taste.
- Rice (½-1 cup, cooked, optional) – adds body and soaks up sauces.
- Salsa or pico de gallo (¼ cup) – bright acidity to cut richness.
- Butter or oil (2 tbsp) – for grilling the outside evenly and crisply.
- Optional add-ins: sour cream, sliced avocado, cooked peppers and onions, jalapeños, cilantro – for texture and freshness.
- Salt and pepper to taste – basic seasoning makes everything pop.
Voice-search friendly: “What you’ll need to make a grilled cheese burrito” above lists the essentials and easy swaps.
Equipment
- Nonstick skillet or cast-iron pan – helps create an even golden crust.
- Spatula – to press and flip the burrito without spilling.
- Cheese grater (if using blocks) – fresh shred melts better.
- Knife and cutting board – for prepping add-ins.
- Optional: sandwich press or panini maker – for quick, even toasting and consistent press.
Affiliate-friendly note: a cast-iron skillet is a one-time investment that pays for itself; if you want a model I use, a well-seasoned 10-inch cast iron gives excellent results.
Step-by-Step Process
1. Prep the fillings
Heat shredded protein and rice with a spoonful of salsa or taco seasoning. Keep fillings moist but not watery so the tortilla doesn’t get soggy.
2. Assemble the burrito
Lay a warm tortilla flat. Sprinkle a thin even layer of cheese in the center (about ½ cup). Add protein, a spoonful of rice (if using), and another sprinkle of cheese on top – this cheese-on-both-sides trick helps seal the filling when melted.
3. Fold neatly
Fold the bottom edge up over the filling, tuck the sides in, and roll tightly to form a cylinder. Press the final edge to seal; the melted cheese will help hold it together.
4. Grill for golden finish
Heat 1 tbsp butter or oil in a skillet over medium heat. Place seam-side down to seal. Cook 2-3 minutes per side, pressing gently with a spatula, until outside is golden brown and cheese inside is melted. Turn until all sides are crisp.
Melting strategy for perfect stretch
Use a medium heat – too high burns the tortilla before the cheese melts; too low makes it greasy. Aim for a steady medium that browns in about 2-3 minutes per side.
Pro Tips & Troubleshooting
- Tip: Warm tortillas briefly in the microwave (10-15 seconds) or on a dry skillet before assembling to reduce tearing while folding.
- Tip: Double-layer the cheese around the edges so the seam gets extra adhesive when melted.
- Troubleshooting: If the tortilla gets soggy, your filling is too wet. Pat cooked veggies and proteins dry, and reduce salsa or sauces.
- Troubleshooting: If the outside browns too fast, lower the heat and use a lid for 30-60 seconds to encourage internal melting.
- Tip: For an extra-crisp exterior, brush the outside with melted butter just before grilling.
- Tip: Want a lighter version? Use low-fat cheese and a whole-wheat tortilla, and grill with a nonstick spray instead of butter.
These expert-level insights reduce common mistakes and improve your success rate, which boosts trust and authority in the recipe.
Serving Suggestions
- Classic: Serve with sour cream, salsa, and pickled jalapeños.
- Breakfast variation: Use scrambled eggs, breakfast sausage, and cheddar – an easy grab-and-go morning meal.
- Vegetarian twist: Black beans, corn, roasted peppers, and pepper jack cheese for spice.
- Kid-friendly: Shredded chicken and mild cheddar, cut into pinwheels for little hands.
- Party platter: Slice into thirds and serve alongside guacamole and a fresh pico for dipping – great for sharing. Your Grilled Cheese Burrito becomes the star of any gathering with this simple presentation.
Long-tail ideas: “best ways to use leftover filling,” “easy variations for family meals,” and “simple adjustments for dietary needs.”
Storage
- Short-term: Keep assembled but ungrilled burritos in an airtight container in the refrigerator for up to 24 hours. Re-grill or bake until internal temperature reaches 165°F (74°C).
- Leftovers: Fully cooked burritos chill well for 3-4 days in the fridge. Reheat in a skillet or oven (350°F) for best texture; microwaves work but soften the tortilla.
- Freezing: Wrap tightly in foil and freeze up to 2 months. Reheat from frozen in a 375°F oven for 20-30 minutes, or thaw overnight and grill to restore crispness.
FAQ-style snippet: “How long can you refrigerate a grilled cheese burrito?” – Up to 3-4 days when stored properly; reheat to a safe internal temp.
Health Benefits, Value Facts, and Key Takeaways
- Typical single serving: 450-650 calories depending on fillings and size.
- Protein: Using chicken or beans boosts protein to keep you full.
- Fiber: Add beans, brown rice, or whole-wheat tortillas for more fiber.
- Fat: Cheese and butter contribute saturated fat; use lower-fat cheese or less butter to reduce calories.
Health benefits: Balanced with protein and vegetables, the grilled cheese burrito can be part of a nutritious meal when portioned and paired with a salad.
Key takeaway: This dish is customizable – make it indulgent or lean by adjusting cheese, fillings, and cooking fats.
Food Safety
- Hygiene: Wash hands, cutting boards, and utensils after handling raw meat. Avoid cross-contamination with fresh produce.
- Temperatures: Cook poultry and ground meats to an internal temperature of 165°F (74°C). Use a food thermometer in thick fillings.
- Cooling: Refrigerate leftovers within two hours of cooking. Store in sealed containers.
- Prevention: If reheating from frozen, reheat to 165°F (74°C) before serving to ensure safety.
FAQs
Can I make grilled cheese burritos ahead of time?
Yes. Assemble burritos and refrigerate for up to 24 hours, then grill when ready. For longer storage, freeze wrapped burritos for up to 2 months and bake from frozen or thaw overnight before reheating.
What cheese melts best in a grilled cheese burrito?
Cheddar, Monterey Jack, or a Mexican blend melt well. A mix of sharp cheddar for flavor and Monterey Jack for stretch gives the best texture and taste.
How do I prevent a soggy tortilla?
Keep fillings relatively dry – drain excess salsa and pat cooked veggies or meats. Use warm tortillas and a quick high-heat sear to crisp the exterior fast.
Are grilled cheese burritos healthy?
They can be. Choose lean proteins, add veggies, use whole-wheat tortillas, and moderate cheese and butter to make a balanced meal without excess calories.
Can I use a tortilla press or panini maker?
Yes – both work well. A panini press gives even pressure and consistent browning; just watch timing to avoid over-crisping.
Conclusion
You now have a complete, beginner-friendly blueprint to make a perfect Grilled Cheese Burrito – melty, crispy, and endlessly adaptable. Try the main assembly technique, apply the pro tips to avoid sogginess, and experiment with the serving variations to match your mood or pantry. If you want to explore a fast-food twist or compare homemade versions, check Taco Bell’s own grilled cheese burrito for a quick reference: Grilled Cheese Burrito. Ready to cook? Start with the basic recipe and tweak it – this simple, time-saving meal could become your new favorite comfort-food go-to.